- My mind was blown when I saw this video on how to eat a chicken wing properly.
- This has to be the best trick for those pants that are just a tad too tight. Because I know we all still want to wear them!
- Oh it's Disney Princess? Put it in Link Love! Seven deadly sins: Disney Princess edition.
- Remember those fork rings I showed a couple of weeks back? Well, now you can make your own.
- 21 home remedies for your skin. Someone let me know if these actually work!
- Ever wonder who decided it'd be cool to pierce your ears? Then take a look at this article "the stories behind your favorite fashion."
- Get ready to be uncomfortable. 10 most embarrassing beauty problems solved!
- Thank you internet for showing me random things that make my life easier, like how to make photo albums on your iphone.
- Makeup shades that look good on everyone.
- Related, sort of: Tips for all you girls out there who hate makeup.
- How to get everyone's favorite New Yorker's hair. That's Carrie Bradshaw of course!
- The Faux bob. Something I'm wanting to try with my hair soon!
- 5 products every woman must have in their bag! And the size of my bag grows...
- Another recipe for homemade pore strips, this one without any gelatin.
- Doctor Who! oh, and fashion inspired by it. Although, I think that a certain blonde is missing.
- I love all of these inspirational quotes. Marilyn Monroe, you are amazing.
- Ah, the never ending jeggings debate.
- All you lazy girls out there! Here are some makeover tips!
- Seeing a celebrity with a new look is something I find very exciting! So the 50 best celebrity makeovers in one spot? Christmas.
- Maybe these acne success stories can help you clear up your red spots.
- Oh my goodness these street artworks are amazing!
- And finally, something we all probably need. 9 easy ways to be happier.
Friday, January 27, 2012
Friday Link Love 1/27/2012
Lots of links this week. Get excited!


Thursday, January 26, 2012
To Pick or Not To Pick
Shakespeare might roll over in his grave if he found out I was using one of his lines to talk about pimples. But then again, the bard would be so dizzy from rolling over from other things he might not mind.
People always say that you shouldn't pick your pimples at all. It leads to scarring and bleeding and other nasties, but if you're like me and have a compulsion to pick than these are the rules you need to follow.
White Heads
They're the way to go. If it's not white, don't touch it! It's not prime yet.

People always say that you shouldn't pick your pimples at all. It leads to scarring and bleeding and other nasties, but if you're like me and have a compulsion to pick than these are the rules you need to follow.
White Heads
They're the way to go. If it's not white, don't touch it! It's not prime yet.
- Heat it up first! Take a warm wet rag and hold it on top of the spot and let the warmness open your pore.
- Find yourself an extractor. They look like this.
 |
| Don't be afraid! |
- The extractor pushes on the area around the pimple and pushes the nasty out. But the important thing about them is that they don't create any scarring.
- Sometimes, you might need a lancet. Basically, it's the equivalent of a needle, but it's made for your skin. Gently, poke your pimple with the slanted edge facing up. Go at from the side.

- If you don't have an extractor, do not use your fingers! Take two cotton swabs and and use those to push on the pimple.
- You know when there's nothing left in your pimple whenever it's just blood coming out.
Blackheads
- Pretty much the same as a white head. Heat. Extractor.
- If you've got a lot of buildup on your nose, apply pressure and pull down with the extractor. But I warn you, it's no walk in the park. It hurts really bad.
Post-Care
- Throw some witch hazel on it.
 |
| Less than $5 at your local drugstore. Can't beat that! |
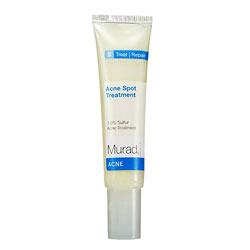
- Then hit it with Murad's Acne Spot Treatment. It's got 10% sulfur acne treatment in it that will help dry it up.
So, tell me. Do you pick your pimples properly? Or have you been doing it wrong like I have?
Wednesday, January 25, 2012
Men: A Simple Trick to Keep You Looking Good

Guys, you have it so easy. It doesn't take a lot to make you look good. A shower, a shave, and bam! Good looks. It's pretty quite amazing. Us ladies, well, it's more of a process.
If you're using your deductive skills, then you've probably guessed that the trick is cleaning up your neck line. It's a fast and easy way to keep that haircut lasting a bit longer.
I've got one tip for doing this yourself:
- ask someone else to do it.
Yes. You could probably do it yourself, using tape and an electric razor. But you know what? If you mess it up, then you're going to have to go into the salon anyways. So do yourself (and your stylist) and favor and ask someone else to do it for you. Your girlfriend. Your roommate. Your mom. Anyone will do. Just tell them to follow the line that you already have. You designated neck-cleaner-upper should be able tell where your new growth is and where to shave it off.
It's easy as pie.
Gentlemen, what are your other ways of keeping up with your look?
photo 1

Tuesday, January 24, 2012
How To Tuesday: 5 Minute Updo
I get tired of wearing my hair down the same way everyday, and I get tired of washing my hair. So sometimes...I like to pull it up and do something fun. Because let's face it...a pony tail just doesn't give me the satisfaction that it used to.
But I like easy hair. Especially when I'm waking up before the sun even rises. So this 5 minute updo is perfect.
A little tip: Curl your hair with a curling iron before you start. It helps keep the ends tucked in better.
This is just a base. This updo can be tweaked, twisted, changed a thousand different ways. Add a braid. Add a bun. Add a flower. possibilities my friends, possibilities.
**Sorry for not posting a picture of the final look. Technical difficulties. Just trust me. It's adorable.
Wednesday, January 18, 2012
Finding Your Perfect Stylist
 |
| Ennie, meanie, miney, mo. |
I've learned a couple of tips that everyone looking for a stylist needs to know.
- Start with looking at the salon. Different salons have different atmospheres, and you might like one atmosphere over the other. So it's important to check them out first.
- If the salon has a website, look over the stylists. Typically, websites will post bios about the stylists. Find one that you think you'll get along with.
- Interview stylist. Book an appointment for a shampoo & style. That will give you an opportunity to talk with your stylist and get to know them a bit.
- Communicate. Talking with your stylist is the most important step. You know what you want, and your stylist knows what you should have. For example: I desperately want a pixie cut, but my stylist tells me that I have too much hair and it wouldn't look like all the pixie cuts I show her do. It's about balancing the two.
- Follow up. You can always go back and talk to your stylist about how your new style is holding up. Also, if for some reason you don't love your style the first time, most salons have a redo policy. Ask about it.
These steps will help you find your perfect fit. And then you'll be as happy as I am! Which is very happy.
Tuesday, January 17, 2012
How To Tuesday: Applying Fake Eyelashes

Typically, I only break out the fake eyelashes when I want to wear a costume. And every time I do, I forget that I don't know how to apply them. It never fails. I buy them, and then I can't put them on. My costume is always incomplete.
How to apply fake eyelashes.
 |
| What you're going to need |
Step 1: start with a clean pallet

That means so mascara and no eyeshadow. You can put all that on later.
Step 2: Prepare the lashes

This is the step that I always skipped and why my lashes never stayed. You have to take the sticky glue off of the lashes that holds them onto the plastic display. If you don't do this, your lashes will most likely not stick.
Also, measure them against your own lashes. Not everyone has the same size eye and lashes aren't "one size fits all". You might need to trim a bit off the end.
Step 3: Glue

Apply the glue to the lashes, in any manner that you want to. Directly on them. Dabbing them in the glue. A cotton swab. It doesn't matter. Just make sure you don't overload the lashes with glue, because remember, it has to go onto your lid. So whatever glue you have it will also be on your lid.
Step 4: Apply

Use your fingers first, then a pair of tweezers to refine the position. They should be placed right at the very bottom of the lid.
Then you're done!

Of course you do your eyeshadow and mascara like normal. But be careful to not pull the lashes off with your mascara wand!
Friday, January 13, 2012
Friday Link Love 1/13/2012
- This updo looks complicated, but the outcomes is simply beautiful. How to style long hair short.
- Another pretty updo (that I'm wearing today!) and it took less than 5 minutes!
- DIY eye makeup remover. I might be a little scared to put something I made myself on my eyes. I mean, we all know how that brownie I made last night turned out.**
- The colder months always leave my hair dry and frizzy, but The Beauty Department shows us how to keep it in check!
- Hello Giggles gives your a bit of Self Confi-dunce this week.
- Oh how beauty ads have changed over the years. These actually looked like real women.
- Foods to nourish your skin. And, as an added bonus, they don't taste awful!
- Um...is this real? LIFE's Living With a Lion.
- Life hacks are my new favorite thing. Don't know what they are? Well...let's just say they'll make your life easier. Okay. That's exactly what they do.
- Lucky reminds us of 40 drugstore classics. I found myself reminiscing of old times. Dr. Pepper Chapstick. Yes please.
- All you Gleeks out there will be saddened (or happy?) to know that there won't be a spin-off.
- As the world groans along with me: A Kardashian magazine?
- Finally something to do with all those leftover candy canes! Adults only please.
- Refinery 29 tells us the 10 fashion trends men hate, and why we should keep wearing them.
- An oldie but a goodie. From ...love Maegan. The perfect updo for date night.
- Filed under strange, and yet I can't look away: The world's weirdest vending machines.
- DIY rope wrapped chain bracelet. I'm definitely going to try this one out!
- 30 reasons to love Kate Middleton. As if I needed anymore? Happy belated birthday Duchess!
- 2 more fun updos!
- R29 shows you a couple of eyeshadow looks.
- Also from R29, how to look good in pictures- The Facebook edition.
- For the lovely manager here at On Stage: Rental Hunting Websites.
- And last...and maybe least. Justin Bieber looks utterly confused in V Magazine.
**I caught my microwave on fire. Yup. Just call me Betty Crocker.
Subscribe to:
Posts (Atom)